How to Use Docker for Application Development: A
Beginner’s Guide
Docker has become a crucial tool in modern application
development, enabling developers to package, ship, and run their applications
consistently across different environments. Whether you're a beginner or
looking to streamline your development process, Docker makes it easier to
build, test, and deploy applications in isolated containers. In this guide,
we’ll walk you through how to use Docker for application development.
**What is Docker? **
Docker is an open-source platform that enables developers to
automate the deployment of applications inside lightweight, portable
containers. These containers package the application code, along with its
dependencies, libraries, and settings, allowing it to run consistently across
different environments, whether it's on your local machine, a cloud server, or
a production environment.
**Why Use Docker for Development?**
Here are some key benefits of using Docker for application
development:
1. **Environment Consistency**: Docker ensures that the
application runs the same way across all systems, reducing the "works on
my machine" issue.
2. **Isolation**: Containers allow you to isolate different
applications or services so they don’t conflict with each other.
3. **Portability**: You can run Docker containers on any
system that supports Docker, including cloud providers like AWS, Azure, and
Google Cloud.
4. **Simplified Dependency Management**: Docker packages all
dependencies, making sure that the right versions are used without manual
setup.
5. **Quick Setup**: Docker allows developers to spin up
environments quickly, helping speed up development cycles.
**Step 1: Installing Docker**
Before you can start using Docker, you need to install it on
your system.
For Windows and macOS:
1. Go to the [Docker website] and
download **Docker Desktop**.
2. Run the installer and follow the on-screen instructions.
3. Once installed, Docker will run in the background and can
be accessed from the terminal or command prompt.
For Linux:
1. Open a terminal and run the following commands to install
Docker:
2. After installation, start Docker with:
**Step 2: Understanding Docker Concepts**
Before diving into Docker commands, let’s understand some
key Docker concepts:
- **Image**: An image is a blueprint of your application
that includes the code, dependencies, and environment settings. It’s a static
snapshot that can be used to create containers.
- **Container**: A container is a running instance of an
image. It’s isolated and runs in its own environment but can interact with the
host system if needed.
- **Dockerfile**: A text file containing instructions to
build a Docker image.
- **Docker Hub**: A cloud-based registry where Docker images
are stored. It’s similar to GitHub, but for Docker images.
**Step 3: Creating a Simple Dockerized Application**
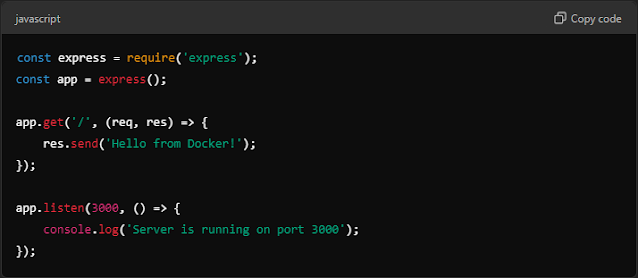
Let’s create a simple Node.js application and run it inside
a Docker container.
1. **Set Up the Project**
First, create a folder for your project:
Inside this folder, create a basic Node.js application:
Create a file called `app.js` and add the following code:
2. **Create a Docker file**
Now, let’s create a `Dockerfile` that will define how to
build the Docker image for this application. In the project folder, create a
file named `Dockerfile`:
3. **Build the Docker Image**
To build the Docker image for your application, run the
following command in the project directory:
This command tells Docker to use the `Docker file` in the
current directory to build an image and name it `my-docker-app`.
4. **Run the Docker Container**
After building the image, you can now run it inside a
container:
The `-p 3000:3000` flag maps port 3000 on your host machine
to port 3000 inside the Docker container. Now, if you open your browser and go
to `http://localhost:3000`, you should see the message **"Hello from
Docker!"**.
**Step 4: Managing Docker Containers**
You can manage Docker containers using simple commands.
List Running Containers:
To see all running containers, use the following command:
Stop a Running Container:
To stop a running container, use the following command:
You can get the `<container_id>` from the `docker ps`
command output.
Remove a Container:
To remove a container (after stopping it), run:
**Step 5: Pushing Your Docker Image to Docker Hub**
If you want to share your Docker image with others, you can
push it to Docker Hub.
1. **Create a Docker Hub Account**: If you don’t already
have an account, sign up for free at [Docker
Hub].
2. **Log in to Docker Hub**:
3. **Tag the Docker Image**:
Tag your image with
your Docker Hub username:
4. **Push the Image to Docker Hub**:
Push the tagged
image to your Docker Hub account:
Now, anyone can pull and run your image using the following
command:
```bash
docker pull yourusername/my-docker-app
```
**Step 6: Docker Compose for Multi-Container
Applications**
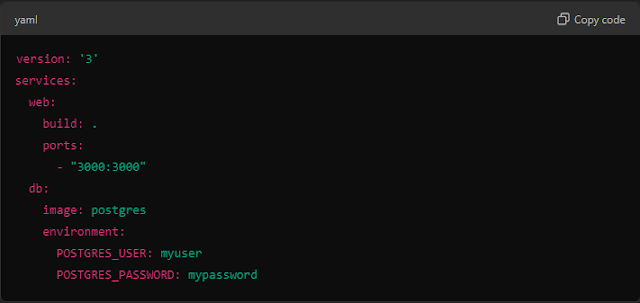
If your application has multiple services (e.g., a web
server and a database), you can use **Docker Compose** to manage
multi-container applications.
1. **Install Docker Compose**:
Docker Compose comes bundled with Docker Desktop, but you
can install it manually on Linux:
2. **Create a `docker-compose.yml` File**:
In the project folder, create a file named
`docker-compose.yml`:
This configuration defines two services: `web`, which is
your Node.js app, and `db`, which is a PostgreSQL database.
3. **Running Docker Compose**:
To spin up both containers, run:
Docker Compose will automatically build and start both
services, allowing them to interact with each other.
**Step 7: Best Practices for Using Docker in Development**
1. **Use `.dockerignore`**: Similar to `.gitignore`, a
`.dockerignore` file helps you exclude unnecessary files (like `node_modules`
or local configuration files) from your Docker image.
2. **Keep Images Lightweight**: Use slim base images (like
`node:14-slim`) to reduce image size and speed up build times.
3. **Clean Up Resources**: Use `docker system prune`
regularly to clean up unused containers, images, and volumes.
4. **Automate Testing**: Use Docker containers to run your
unit and integration tests in isolated environments, ensuring consistency
across development and production.
**Conclusion**
Docker is an incredibly powerful tool for application
development, allowing you to create consistent, reproducible environments for
building, testing, and deploying your applications. With Docker, you can ensure
that your app works seamlessly across all systems, making it an essential part
of modern development workflows.
By following this guide, you’ve learned how to install
Docker, create Dockized applications, manage containers, and push images to
Docker Hub. Stay tuned to **Tech-Tutorials point** for more advanced Docker
tutorials and tips!


0 Comments